Gear Mod: Dynafit Leash with Fuse

A binding leash with breakaway fuse, making what should be a simple thing – complex. This is a gear modification several years in the learning, a few hours in the making, and a joyous cold beer in hand when solved. I need to preface with a warning, which I will highlight at the end as well. Binding leashes and leash modifications can cause serious injury or death. Please be very familiar with the dynamics of how these work, and the consequences both with, and without a leash system. I apologize for the melodramatic tone, but even in the backcountry, the Darwin in us can make an appearance.
Background

This modification came from lessons learned, so I will briefly sum them up in two short reflections to offer some background.
Lesson 1 (leash with no breakaway): Dragontail Couloir, Rocky Mountain National Park, April 2013. Rather than drop in from Flattop Mountain above the couloir, our group decided to approach from Emerald Lake and on to the apron of the Dragontail. We figured we could skin most of the way up the apron and then switch to an A-frame with an axe and bootpack up the couloir. The reasoning was to have a close look at the snow coverage from within the couloir on the ascent rather than blindly coming down it. At the time, I had cable leashes on the Dynafits, and this was an incline that would be ‘unfun’ to have anything get loose.
During the incline we had a small amount of wetslab move against the rock walls. It wasn’t enough to raise concerns about a full slide coming down the couloir, but it was enough to scare us off skinning and switch to bootpacking from that point on. While I was transitioning, the reality of the cable leash hit me. I always had a small concern about getting caught in a slide with a leash attached to the Dynafit — which would result in being ‘submarined’ in a slide. But for some reason that day on the steep face I realized I didn’t want to tempt fate. I opted to lose the leashes.
Lesson 2 (no leash): Dream Chutes, Rocky Mountain National Park, December, 2012. The powder near the bottom of the chutes was easily three feet deep. We had approached from Lake Haiyaha to drop from the top of the chutes. Amazing snow, and awesome conditions. Upon all of us making it out of the chutes and gathering at Dream Lake, we opted to skin back up for another run. About three quarters of the way up the chute, my partner Rob snarled over a downed tree in the bottomless powder. His foot twisted and the Dynafit broke loose. His right ski backtracked, sliding halfway down the chutes. Both of us saw the rough location that it went to and we backtracked down the chutes to recover it. The ski ended up in 3-4′ of powder. It took more than two hours to find it, prodding endlessly. Luckily for us it was early in the day.
It was the following year that I decided to revert back, and use a leash between the AT boot and the Dynafit.

The Dilemma
Somewhere between those two lessons, there is a medium ground in regards to using leashes. Surely you want to have a leash in glacier travel and steeper slopes. A ski or splitboard getting away can be more than just an inconvenience if it lands in crags or chest deep powder. At the same time, you do not want to be traversing in avalanche terrain with a leash system that leaves you hopelessly attached to your ski or splitboard. More often than not, the times when you need leashes the most, are exactly that; avalanche terrain.
Black Diamond, Dynafit, and a few other companies carry a commercial binding leash, but these leashes will not breakaway during a fall, or if you are unfortunate enough to get caught in an avalanche.
A few of the commercial leashes available:


There are a number of modifications out there, especially in the realm of telemark skiing. Some people use keyrings of varying thickness to act as fuse between the boot and binding. There are even plastic fuses made by B&D Ski Gear for the task. Even with the options out there, I still hadn’t found exactly what I wanted. So, along came the task of designing my own. I knew I would have to start completely from scratch and determine the amount of A physical energy that can push or pull on something. Your weight is the force that you push on the earth with, when there are no other accelerations." class="glossaryLink " target="_blank">force for my The force created by gravity acting on a mass." class="glossaryLink " target="_blank">weight and application.
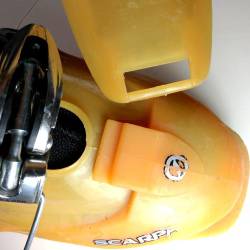
Application for Splitboarding
Very rarely do we use a splitboard in ski mode. The only time I can recall ever having to do this are long tracks out of the hut systems when on cat tracks or rollers. In any case, whether you do, or do not have leashes in these situations is irrelevant. For the most part, on a splitboard, they are needed ascending sketchy or steep terrain. Stomping in at an angle is when I notice the Dynafit toe-piece is most vulnerable. So, I know roughly the amount of force that I DO NOT want my leash to breakaway. On that token, I DO know I want it to breakaway at the very beginning of a slide. That’s a fairly pinpoint zone, and where it differs from that of a ski – now all we have to do is figure out what that amount of force is.
[+] How I measured Force
[+] What is a Newton (unit) and how I measured?
As mentioned in the explanation above, I used a pull spring scale as a dynamometer to see what kind of forces I would need at my binding / boot to release it. My target was 112(N). For a splitboard the only thing we need leashes for is the touring ascent (if you are using a soft boot setup, or Sparks R&D setup – then you are hopelessly attached to your splitboard in the unfortunate case of an avalanche — therefore, this does not apply to you). I did several bench tests with the boot and Dynafit binding. 150(N) was way to much force, which is where many telemark skiers prefer a breakaway. 75(N) was too little. I dialed in a target between 110-115(N).
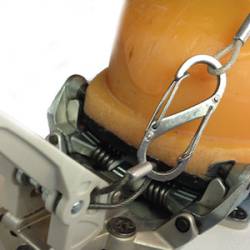
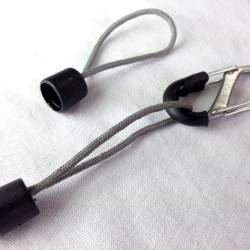
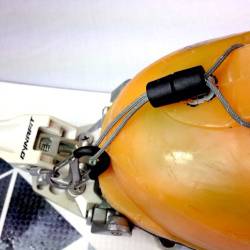
Breakaway Leash Concept
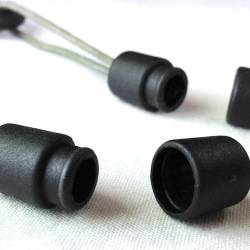
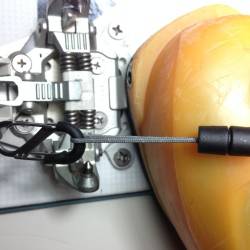
I designed a new leash system using a breakaway clasp designed for paracord wristbands. I will show you the materials with a lot of photos so that you can get the idea from multiple vantage points. Barrel claps made for paracord worked very well for my application. There are likely several ways this could be done, with several different types of micro clasps made for bracelets, necklaces, collars, etc. I have seen several variations of the barrel clasp out there. The craft store variety seem to have a weaker breakaway. The barrel clasp used I found at a local outdoor store that carries every type of webbing and buckle imaginable.
Breakaway Leash Modification
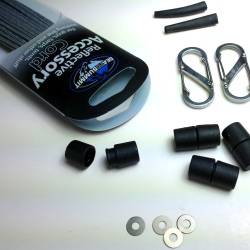
Materials:
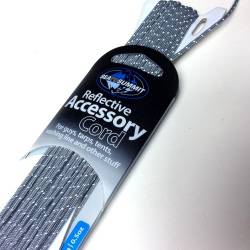
- Paracord or micro accessory cord
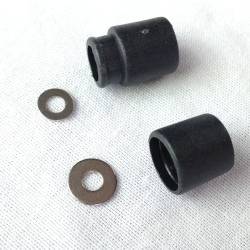
- Breakaway connectors
- Stainless steel washers
- Carabiners
- Rubber tube or heat shrink tubing
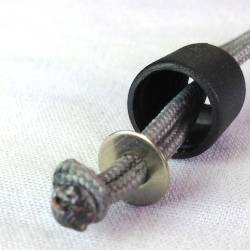
Out of the bag it takes the barrel clasp about 140(N) of force to break away, but very light sanding with emery cloth on the male ring decreases the resistance and I was able to dial it in to an exact range between 110-115(N). You could follow the same principle with any buckle or clasp. I repeated the breakaway test about 20 times to see how consistent it was using the spring scale (dynamometer). The result was fairly consistent – 110-115(N).

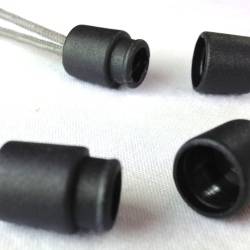
Once I had this dialed in, the assembly of the leash was easy. I opted to use an accessory cord thinner than paracord. Most paracord is rated for 550lbs (uh…hence the name 550 cord), or roughly 1140(N), which was way more than I needed. The accessory cord; in this case from Sea to Summit is rated at about 175lbs, or roughly 778(N). Still ample strength for this application. The other reason I like accessory cord over 550 cord is because of less surface area for ice and snow to build up on. A tip, if you design your own, keep the leash as short as possible. For you climbers out there, think: static line. Accessory cord, at least the type used in this application, is not dynamic, but rather static. So keeping the length shorter will provide a better release.
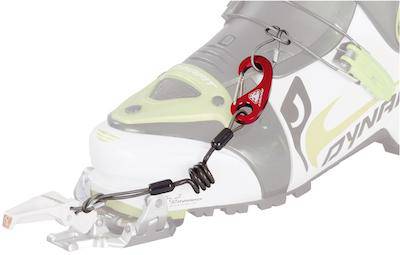
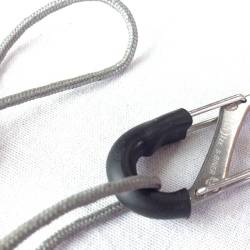
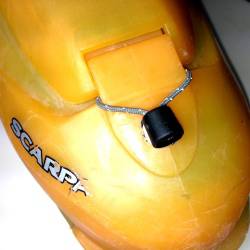
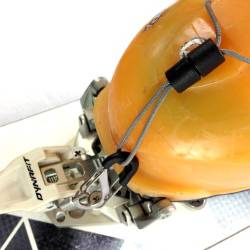
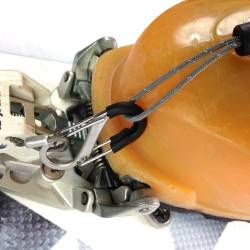
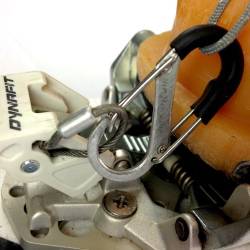
I used small carabiners and closed off one end using a small piece of rubber tubing by sliding them on to the carabiner gate. While it’s not necessary, it makes it easier to manage. This enables a rapid attachment to the binding toe-piece, even with gloves on. Heat-shrink tubing would also work, but I had a few pieces of rubber tubing on-hand that was perfect for the job. I also used small stainless steel micro washers inside the fuse connector to keep the accessory cord from just ripping out of the plastic connector end should blunt force occur.
These leashes work fantastic. It has turned out to be an awesome modification and offers a piece of mind. It allows time for a beer at the trailhead with friends instead of looking for a lost ski in the dark with a headlamp. If you attempt this mod, be sure to test it multiple times before using it in the backcountry — pay special attention to how you tie your breakaways so that they do not catch on the carabiner, binding, or implements on your deck.


I realize this is a pretty simple modification. It combines the advantage of having a leash so you don’t orphan a ski or splitboard, while at the same time offering a breakaway in an avalanche or fall. The modification however does fall squarely in the “low risk, high consequence category”. With that said, I have to give the full legal warning and word of caution about this modification;
Modifying your deck, boot or binding is dangerous business. Know the consequences of what you are doing before you attempt a leash or binding modification. Leashes that fail to release in steep terrain can cause serious injury. In an avalanche, a leash that does not release will cause you to stay attached to your splitboard and may cause a submarine-effect in a snow-slide – potentially pulling you to the bottom. This modification should only be attempted if you are familiar with what the result is.